Uploading a Mailing List
We discussed the merits of mailing lists in the "Mailing List Overview" section, now let's go ahead and add one.
Access Mailing Lists
Click on the My Account tab then Mailing Lists tab.

- Click the Upload Mailing List button as shown below.

- A dialog box will appear prompting you to select the mailing list file and input a file name as shown in the screen shot below.

- Click the Choose File button to select the file you wish to upload.
- Input the name you wish to associate with this list into the List Name field.
- Click the Upload button to upload your mailing list.
- If the mailing list file that you've uploaded contains columns that match the ones specified in the column definitions, your file has been successfully uploaded.
- However, if ContentWelder is unable to match the columns in your uploaded file to the expected list columns, you will be prompted to map the mailing list fields to resolve any errors that may have occurred.
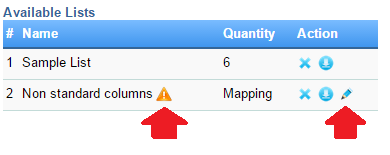
- If you see the icons highlighted below, this is an indication that ContentWelder needs your help to remap fields in your mailing list file.

- If you see the icons highlighted below, this is an indication that ContentWelder needs your help to remap fields in your mailing list file.
Field Mapping
Once you've selected a mailing list file and clicked the Upload button, if the system has trouble matching the columns in your uploaded file to the expected list columns, you will be prompted to the Mapping step below.
This is evident as indicated above when you see the 'yellow' warning and 'blue pencil' icons.
Map Mailing Lists Fields
- In the Available Lists dialog box, click the
 icon to perform the mapping.
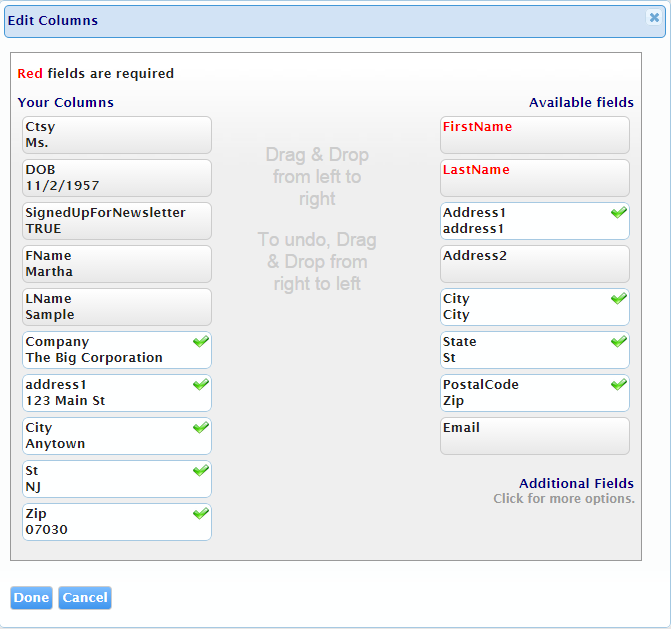
 - The Edit Columns dialog box will appear for you to remap incorrect fields as shown in red in the screen shot below.

- In the screen shot above, the FirstName and LastName header fields shown in the Available Fields column have a mapping discrepancy. They are required fields and are empty. To resolve this error, simply drag the corresponding field from the left column to the right column to correct the error.
- Click the Done button and your mailing list should now be free of mapping errors. The fields shown with green check marks have been correctly mapped and no further action is required.
Now that ContentWelder has the information it needs, it will process the file.
